Secure VPC Setup with EC2 Instances

The AWS Virtual Private Cloud (VPC) allows us to create a logically isolated section of the AWS Cloud. In this article, I'll walk you through the process of setting up private subnets with a NAT gateway in AWS VPC. This configuration enables instances in private subnets to communicate with the internet while keeping them secure from direct exposure.
To improve resiliency, we deploy the servers in two Availability Zones, by using an Auto Scaling Group and a Load Balancer. For additional security, we deploy servers in private subnets. The servers receive requests from the Internet through the Load Balancer, which is in a public subnet. The Load Balancer distributes the requests to the servers in the private subnets. The servers in the private subnets can access the Internet through a NAT gateway that is in a public subnet.
Here we will:
Design and configure a VPC: Create a VPC with custom IP ranges. Set up public and private subnets. Configure route tables and associate subnets.
Implement network security: Set up network access control lists (ACLs) to control inbound and outbound traffic. Configure security groups for EC2 instances to allow specific ports and protocols.
Provision EC2 instances: Launch EC2 instances in both the public and private subnets. Configure security groups for the instances to allow necessary traffic. Create and assign IAM roles to the instances with appropriate permissions.
Setup Networking and routing: Set up an internet gateway to allow internet access for instances in the public subnet. Configure NAT gateway or NAT instance to enable outbound internet access for instances in the private subnet. Create appropriate route tables and associate them with the subnets.
Generate SSH key pair and configure access control: Generate an SSH key pair and securely store the private key. Configure the instances to allow SSH access only with the generated key pair. Implement IAM policies and roles to control access and permissions to AWS resources.
Test and validate the setup: SSH into the EC2 instances using the private key and verify connectivity. Test network connectivity between instances in different subnets. Validate security group rules and network ACL settings.
AWS Architecture Diagram

Create the VPC
Use the following procedure to create a VPC with a public subnet and a private subnet in two Availability Zones, and a NAT gateway in each Availability Zone.
To create the VPC
Open the Amazon VPC console at https://console.aws.amazon.com/vpc/.
On the dashboard, choose Create VPC.
For Resources to create, choose VPC and more.
Configure the VPC
For Name tag auto-generation, enter a name for the VPC.
For IPv4 CIDR block, you can keep the default suggestion, or alternatively you can enter the CIDR block required by your application or network.
If your application communicates by using IPv6 addresses, choose IPv6 CIDR block, Amazon-provided IPv6 CIDR block.
Configure the subnets
For Number of Availability Zones, choose 2, so that you can launch instances in multiple Availability Zones to improve resiliency.
For Number of public subnets, choose 2.
For Number of private subnets, choose 2.
You can keep the default CIDR block for the public subnet, or alternatively you can expand Customize subnet CIDR blocks and enter a CIDR block. For more information, see Subnet CIDR blocks.
For NAT gateways, choose 1 per AZ to improve resiliency.
If your application communicates by using IPv6 addresses, for Egress only internet gateway, choose Yes.
For VPC endpoints, if your instances must access an S3 bucket, keep the S3 Gateway default. Otherwise, instances in your private subnet can't access Amazon S3. There is no cost for this option, so you can keep the default if you might use an S3 bucket in the future. If you choose None, you can always add a gateway VPC endpoint later on.
For DNS options, clear Enable DNS hostnames.
Choose Create VPC.
Final Resource Map (not including VPC endpoint/S3 Gateway)
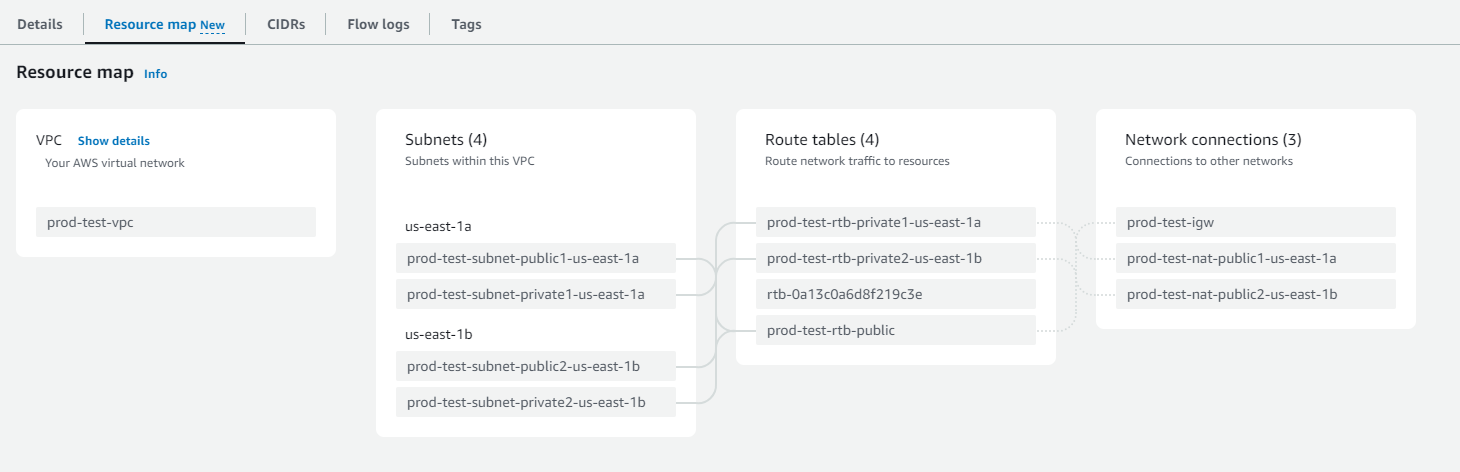
Note: This creates a bunch of resources (VPC, subnets, route tables, internet gateway, NAT gateway, elastic IPs to attach to the public NAT Gateway) in the AWS VPC console as configured. Have some patience!
Deploy the application
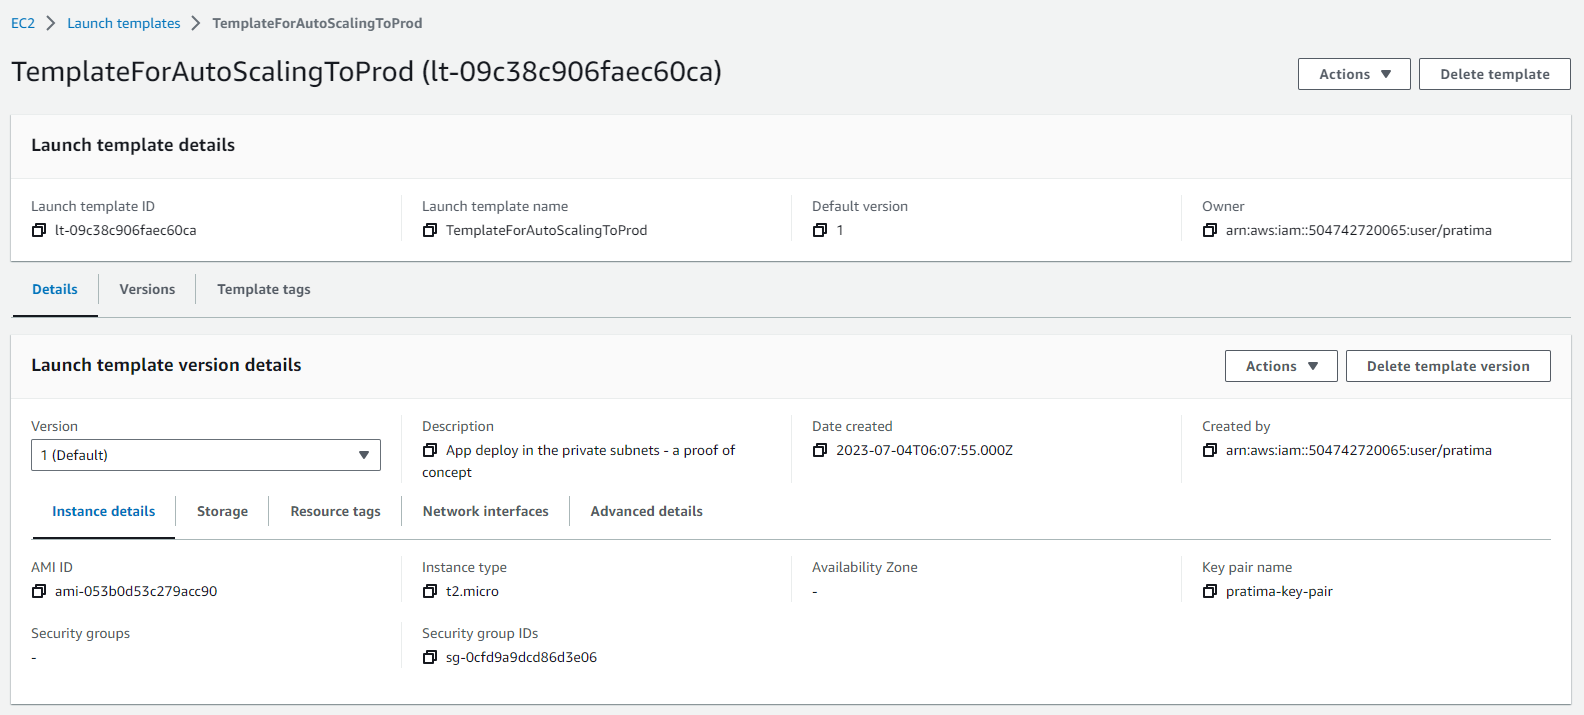
We will create a launch template to specify the configuration information needed to launch our EC2 instances by using Amazon EC2 Auto Scaling. The launch template acts as a reference template for future use or can be reused across multiple AutoScaling Groups)
Select the AMIs or Instance Type specifying its attributes (choose
Free Tierfor the 'proof of concept' practice), create/choose key pair (login)Network settings: Specify the existing security group or create new enabling SSH (22) inbound traffic from external networks.
Select the same VPC created above because we are implementing the ASG in the same environment. Add the inbound security group rule for the EC2 instances you are going to add. It is exactly the same as the EC2 instance configuration. Here we are using Auto Scaling Group to launch EC2 instances.
When you are ready to create the launch template, choose Create launch template.
This is what it looks like (EC2 ASG Launch Template):
For step-by-step directions, see Create a launch template for your Auto Scaling group in the Amazon EC2 Auto Scaling User Guide.
Now, we will create an Auto Scaling group, which is a collection of EC2 instances with a minimum, maximum, and desired size. We choose Create Auto Scaling group from the confirmation page. On the Choose launch template or configuration page, do the following:
For Auto Scaling group name, enter a name for the Auto Scaling group. For Launch template, choose an existing launch template created in Step 1.
On the Choose instance launch options page, under Network, for VPC, choose a VPC. The Auto Scaling group must be created in the same VPC as the security group we specified in our launch template.
For Availability Zones and subnets, choose one or more subnets in the specified VPC. Use subnets in multiple Availability Zones for high availability. We will be using the private subnets as our application servers will be deployed in the private subnets.
On the Configure advanced options page, we will accept the rest of the defaults and move on as we will configure the load balancer later.
On the Configure group size and scaling policies page, we will set the
Desired Capacityas 2,Minimum Capacityas 1 andMaximum Capacityas 2.
We will not configure notifications for now so we will click on Next and move ahead to the Review page and choose Create Auto Scaling group.
For step-by-step directions, see Create an Auto Scaling group using a launch template in the Amazon EC2 Auto Scaling User Guide.
Here is the final look at it:

Verify the instances created on two availability zones - us-east-1a, us-east-1b
by checking on the EC2 instance dashboard. Since these two instances are created in a private subnet they do not have public IP addresses which is expected to keep them secure. But how do we log in to those instances? That's where Bastion or Jump Server comes into the picture.
In the next step, in order to remote access securely to a private network, we will create a Linux Bastion Host and will create an audit trail by logging SSH commands. Personally, I’m most comfortable with Ubuntu Server, so
In the EC2 Dashboard, I will click on the "Launch Instances" button.
Choose an Amazon Machine Image (AMI) for our bastion host i.e. Ubuntu, you can choose as per your preference such as Amazon Linux as well.
Select an instance type and configure the instance details.
Provide key pair
In the "Network" section, I will select the VPC created in Step 1 and choose a public subnet.
Enable the "Auto-assign Public IP" option. Without a public IP address, Bastion Host will be of no use.
Likewise, I will create or choose the security group which has SSH (22) enabled in the inbound rule as we need to login to the EC2 instance (i.e. Bastion Host), and from there again we need to SSH to the EC2 servers in the private subnets.
Configure storage, tags, security groups, and any other desired settings.
Review the instance details and click "Launch" to create the bastion host.
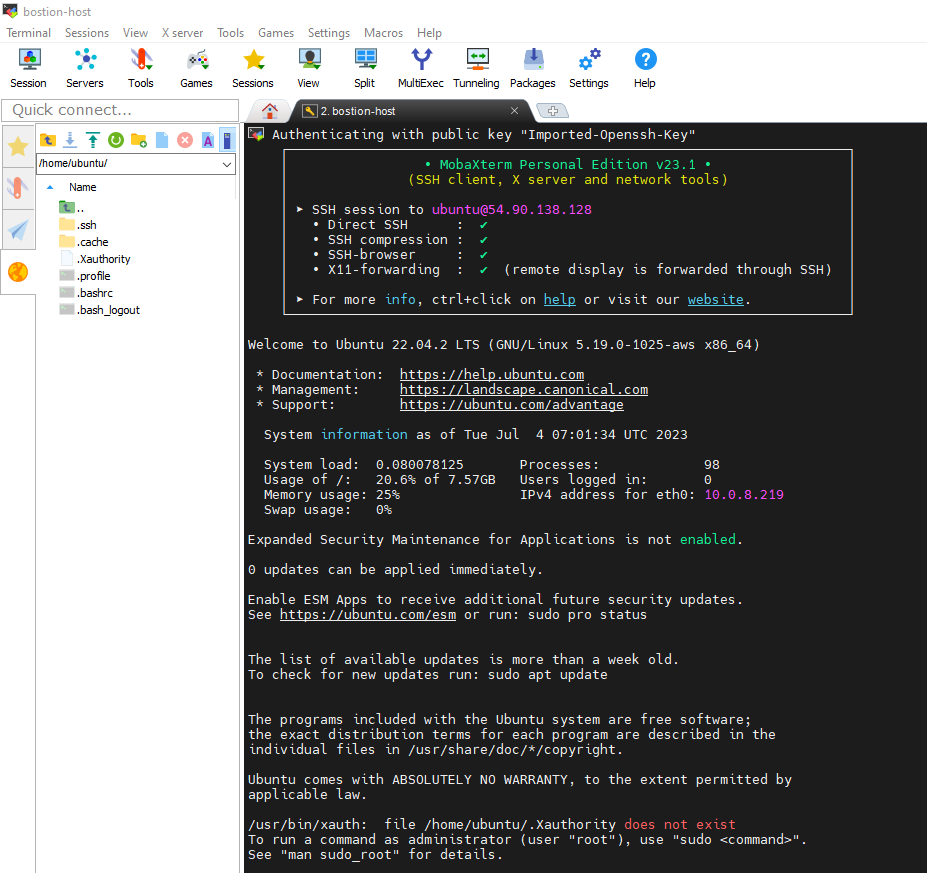
Once the Bastion host is created, we will test the connectivity to the Bastion Server. I launch MobaXterm or you can use any SSH client tool of your choice to SSH to the Bastion server with the provided key pair.
You may have doubted that we created only one Jump Server on a public subnet under one availability zone, how could it access another availability zone's private instance??
Here, let me explain to you, the Bastion or Jump server acts as a mediator between the private subnet and the public subnet. A bastion server can be created across availability zones. When we create a bastion host or any EC2 instance in a public subnet, they get created with both public and private IP addresses where the private IP address is from the VPC range. Any instances within the VPC can communicate with the private address.
Now that we have our public-facing Bastion host configured and locked down to allow SSH connections, we will connect to the EC2 instances in our private subnet from the Bastion Host. To SSH to the EC2 instances in the private subnets, the Bastion host should have the private key which is currently in our local device. In order to copy the local key pair to the remote Bastion server/host, we use the SCP (secure copy) command to securely transfer the file.
scp -i My2023key.pem My2023key.pem ubuntu@<public-ip-address-of-ec2-instance-we-need-to-copy>:/home/ubuntu
then type the following:
chmod 400 My2023key.pem
Then, we will issue the following command to connect to the instance:
ssh -i "My2023key.pem" ubuntu@ec2-52-34-25-159.us-west-2.compute.amazonaws.com
Inside the private EC2 instance, we need to install a web server, such as Apache or Nginx on each EC2 instance. We ensure that the security groups for these instances allow HTTP access on port 80. Or, we can pick up a simple HTML template from W3schools and create an index.html. Then we can run the Python server using the command python3 -m http.server 8000.
Till here, we have
Decided which two availability Zones to use for our EC2 instances, and completed configuring our virtual private cloud (VPC) with at least one public subnet in each of these Availability Zones, these public subnets are used to configure the load balancer in the next step.
Launched one EC2 instance in each Availability Zone in a private subnet and created a Bastion host to connect to these private instances.
Next, we will create a load balancer, which distributes traffic evenly across the instances in our Auto Scaling group, and attach the load balancer to our Auto Scaling group.
Firstly, we will configure our target group for the load balancer just like we created a 'Launch Template' for ASG.
In the navigation pane, under Load Balancing, we choose Target Groups and choose Create target group.
Under Basic configuration, we keep the Target type as an instance.
For the Target group name, we enter a name for the new target group**.**
We keep the default protocol (HTTP) and port (80) for the Apache server. However, if you are using the Python server with port 8000 running in your private instance configure it to 8000. (Ports for routing traffic to the selected instances.)
We select the VPC containing our instances. Keep the protocol version as HTTP1.
For Health checks, we keep the default settings.
Choose Next.
On the Register Targets page, we must register this target if we want to test our load balancer and ensure that it is routing traffic to this target.
For Available instances, we select the two instances in our private subnet.
Keep the default port 80 (or change it to 8000 for Python HTTP server), and choose Include as pending below.
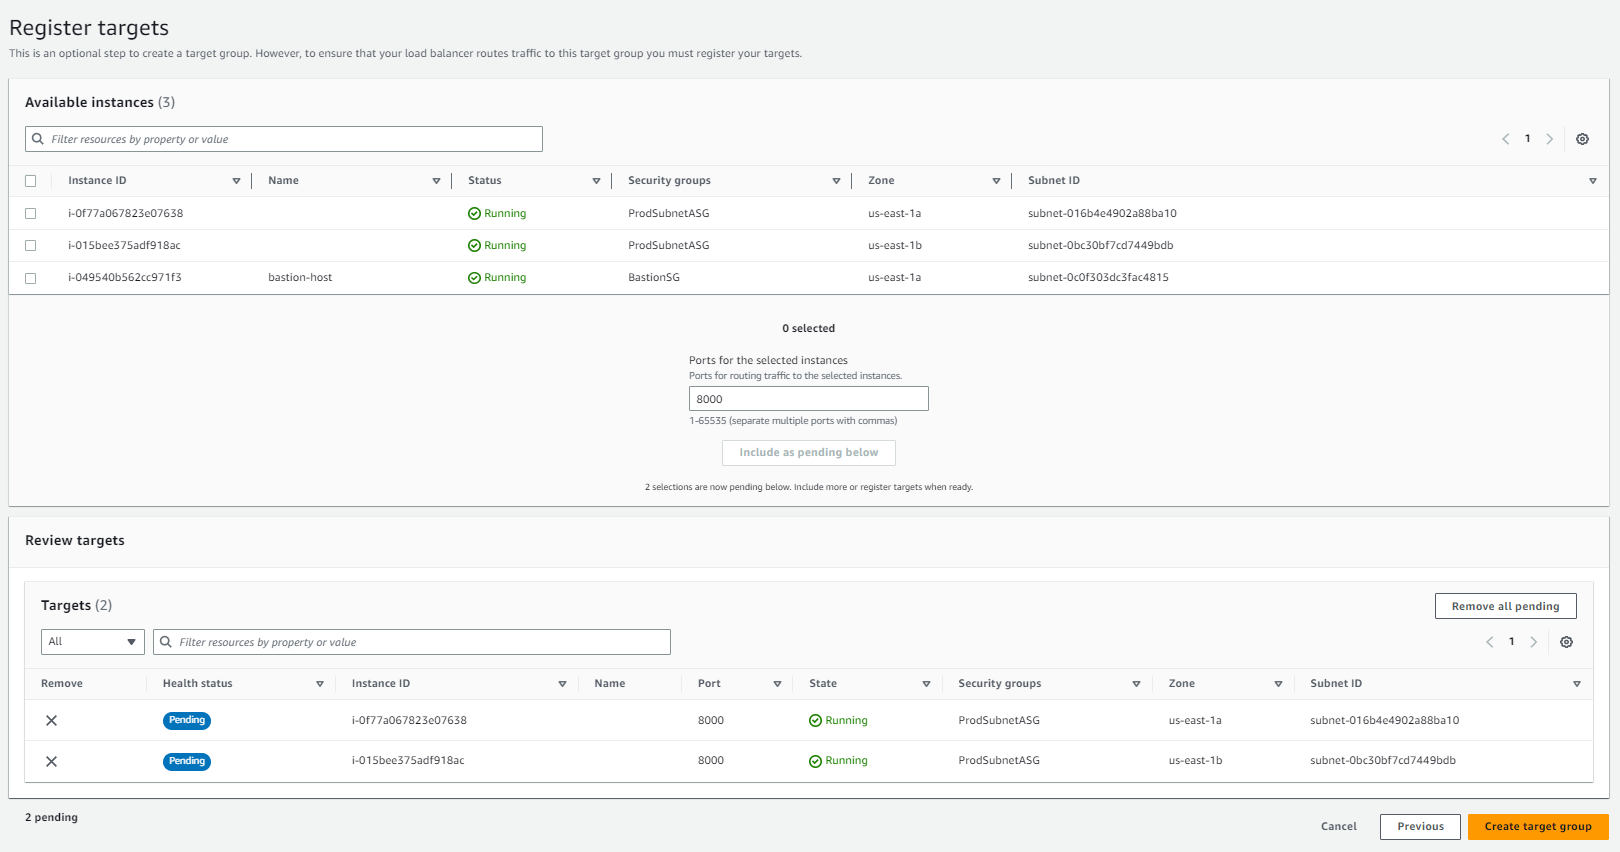
Choose 'Create target group'.
After creating the target group, we will choose a load balancer type (i.e. Application Load Balancer), choose Create and accordingly, we will configure our chosen load balancer.
For the Load balancer name, we entered a name for our load balancer. For example,
alb-prod-01.For Scheme and IP address type, we kept the default value
Load Balancer should always be
internet facing. It should be inpublic subnet.For Network mapping, we selected the VPC that we used for our EC2 instances. We select at least two Availability Zones and one subnet per zone. For each Availability Zone that we used to launch our EC2 instances, we selected the Availability Zone and then selected one public subnet for that Availability Zone.
For Security groups, we selected the default security group for the VPC that we selected in the previous step. We can choose a different security group instead. The security group must include rules that allow the load balancer to communicate with registered targets on both the listener port and the health check port. For more information, see Security group rules.
For Listeners and routing, we kept the default protocol and port, and selected our target group from the list. This configures a listener that accepts HTTP traffic on port 80 (or 8000 for the Python HTTP server) and forwards traffic to the selected target group by default. We are not creating an HTTPS listener here.
For Default action, we select the target group that we created and registered in the above steps.
After reviewing our configuration, we choose Create load balancer
For more information, see the Elastic Load Balancing User Guide and Use Elastic Load Balancing in the Amazon EC2 Auto Scaling User Guide.
After the load balancer is provisioned, copy the DNS Name of the load balancer (for example, my-load-balancer-1234567890abcdef.elb.us-east-2.amazonaws.com). Paste the DNS name into the address field of an internet-connected web browser. If everything is working, the browser displays the default page of the servers based on the traffic. If any of the instances in the target group are unhealthy, the target group actively monitors for the healthiest instances when the Health Check configuration is active. You can disable the Health Check and send the load traffic to both EC2 instances irrespective of the health.
In this article, we've walked through the process of setting up private subnets with a NAT gateway, as well as creating a bastion host for secure access to instances within the private subnets and creating the load balancer to distribute the equally distribute the traffic to the private EC2 instances. By following these steps, we can create a secure network infrastructure that allows instances in private subnets to access the internet and facilitates secure remote access to private instances using the bastion host.
Remember to regularly monitor and manage the VPC resources, including the NAT gateway and bastion host, to ensure optimal performance and security.